JWT와 Spring 환경의 Web Server가 어떻게 동작하는지 알아보자.
동작 과정
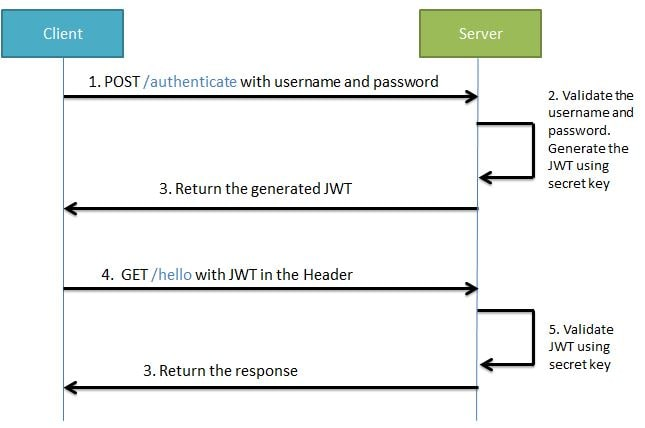
- 클라이언트가 로그인요청을 보낸다.
- POST 방식으로 id(email)와 pw를
/authenticate에 요청한다.
- POST 방식으로 id(email)와 pw를
- 서버는 id와 pw로 회원 정보를 조회하고 맞다면 JWT를 반환한다.
- 클라이언트는 JWT를 로컬에 저장한다.
- 이후 클라이언트는 서버에 요청을 보낼 때 마다 헤더에 Token을 포함시킨다.
- 서버는 요청을 받을 때 마다 Token이 유요한지 검증한다.
- Token이 검증되면 따로 id와 pw를 검사하지 않아도 사용자 식별이 가능하다.
- 검증 결과에 맞게 응답한다.
실제 동작 과정
1. 클라이언트 로그인 요청
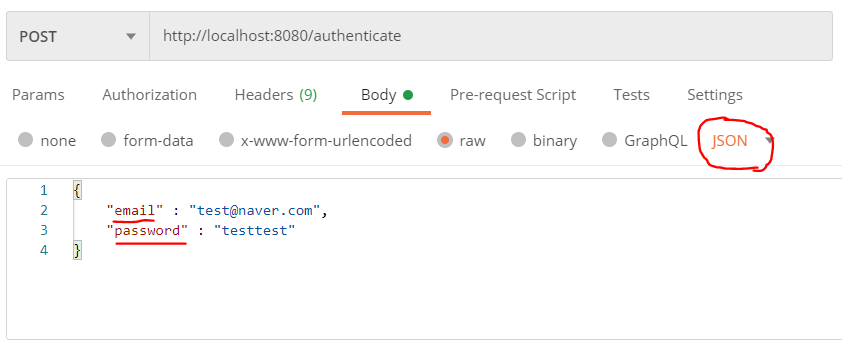
/authenticate로 POST요청을 보낸다. 이 때 Request Body에는 JSON형태로 사용자의 email과 password를 보낸다.
2. 서버 회원 정보 조회 및 JWT 반환
WebSecurityConfigurerAdapter를 상속받은 WebSecurityConfig에서 /authenticate는 인증되지 않은 사용자도 접근 가능하게 한다.
WebSecurityConfig.java
1 | |
이제 사용자의 요청이 Controller에 의해 처리된다.
JwtAuthenticationController.java
1 | |
해당 Controller에서는 authenticationManager에 의해 사용자 email과 인코딩된 비밀번호를 조회한다. authenticationManager는 WebSecurityConfig에서 설정되었으며 해당 사용자가 DB에 존재한다면 UserDetailsService로 인증된 사용자 객체를 사용하여 Token을 생성한 뒤 반환한다.
UserInfo DB

UserDetailsService
1 | |
JwtTokenUtil.java - generate Token
1 | |
Token을 생성할 때 Claim에 subject로 사용자를 식별하는 정보(ex: email)가 들어간다.
이렇게 생성된 JWT는 반환되어 사용자가 받을 수 있다.

클라이언트 요청 (with JWT)
클라이언트는 토큰을 수신한 뒤 이후에 보내는 모든 요청의 헤더에 토큰을 넣는다.
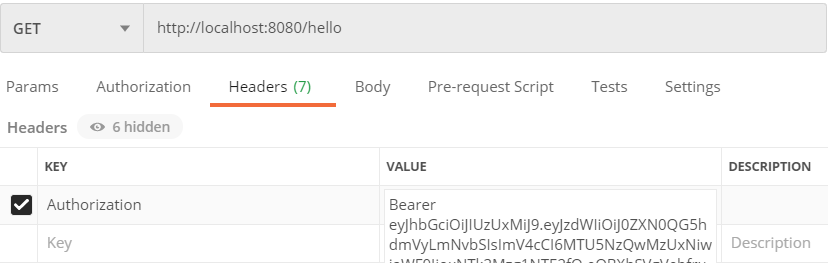
헤더의 key값은 Authorization을 value에는 Bearer를 앞에 명시해준 뒤 수신받은 토큰값을 넣어준다.
ex) Bearer eyJhbGciOiJIUzUxMiJ9.eyJzdWIiOiJ0ZXN0QG5hdmVyLmNvbSIsImV4cCI6MTU5NzQwMzUxNiwiaWF0IjoxNTk
3Mzg1NTE2fQ.eQBXhSVgVebfruLLQbJbi3rm6siyEAStGz349IGcmpvwuWujz5O6OEcgJkIrBBy2aFHHDSI8AKNtmaN4gB6WqQ
서버에서는 모든 요청을 검사하기 위해 Filter를 추가해준다. Filter의 추가는 WebSecurityConfig에서 진행되고 Filter의 구조는 다음과 같다.
JwtRequestFilter.java
1 | |
필터는 다음과 같이 동작한다.
- 요청 헤더에서
Authorization값을 추출한다. - 추출된 값이
Bearer로 시작하는지 확인한다. - JWT 값을 추출하고 추출된 값에서 사용자 email을 획득한다.
- email값으로 인증된 사용자 객체를 생성하여 반환한다.
필터를 거쳐 검증된 JWT인것을 확인 받으면 원래 가려던 목적지로 이동한다. 해당 예시에서는 /hello 로 요청했으며 내용은 간단하게 구성했다.
1 | |
JWT가 유효하다면 아래와 같은 결과를 얻을 것이다.
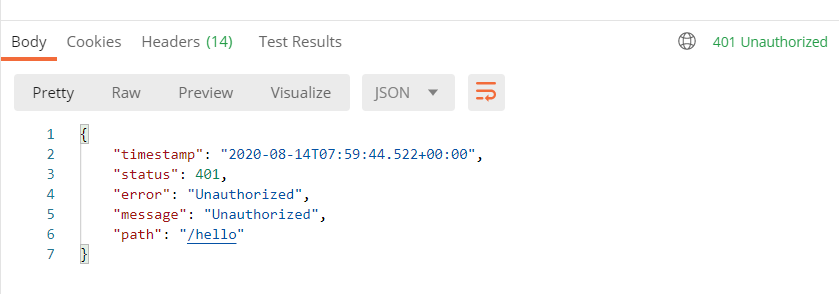
 만약 헤더에 JWT가 존재하지 않거나, 유효하지 않은 JWT가 존재한다면 401 응답을 받을 것이다.